原生的
Toast其实相当好用,而且足够简单轻量,但是架不住需求千奇百怪,而且老板一般都会觉得这个提示不明显!原本Toast是可以自定义样式的,但现在setView方法已经过期,本文通过自定义View的形式来实现类Toast效果,先上效果图
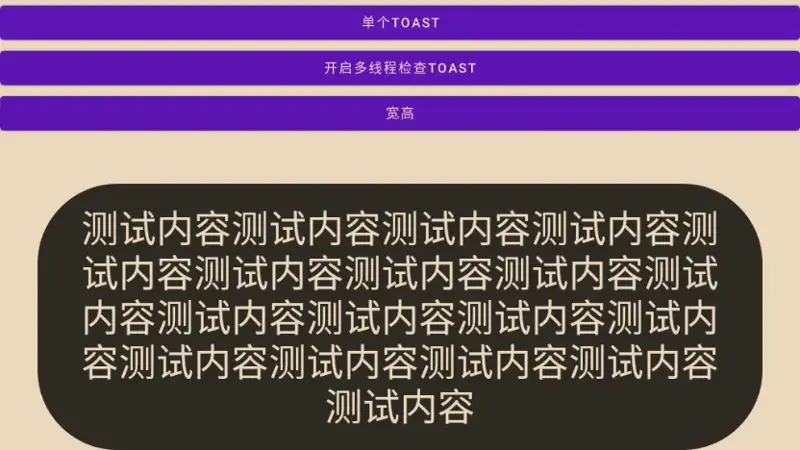
长文本效果
循环跑了100个协程的效果
获取屏幕宽高
因为需要将Toast显示到一个大致固定的位置、尽量显示一行且不能超过屏幕宽度,所以需要获取屏幕宽高,这里简单写了个工具类。
object DisplayUtil { / * 可用显示大小的绝对宽度(以像素为单位) */ fun getWidth(): Int = Application.getInstance().resources.displayMetrics.widthPixels / * 可用显示大小的绝对高度(以像素为单位) */ fun getHeight(): Int = Application.getInstance().resources.displayMetrics.heightPixels } 这里使用的是单例Application来获取resources,还不知道的可以网上搜一下,也可以看看这篇文章<<Android 获取当前Activity>> 里面写了单例Application的代码。
自定义Toast
先创建toast_dialog_bg_style.xml用作Toast的背景样式,这里就是黑色有一点点透明的圆角背景。
<?xml version="1.0" encoding="utf-8"?> <shape xmlns:android="http://schemas.android.com/apk/res/android" android:shape="rectangle"> <corners android:radius="85dp"/> <solid android:color="@color/toast_bg" /> </shape> 然后是Toast的布局,创建alert_dialog_toast.xml,我这里只放了文本,有兴趣的可以在布局里加上图片之类的。
<?xml version="1.0" encoding="utf-8"?> <LinearLayout xmlns:android="http://schemas.android.com/apk/res/android" android:orientation="vertical" android:layout_width="wrap_content" android:layout_height="140dp" android:background="@drawable/toast_dialog_bg_style" android:padding="20dp" android:paddingEnd="40dp" android:paddingStart="40dp" android:gravity="center"> <TextView android:id="@+id/toast_text" android:layout_width="wrap_content" android:layout_height="wrap_content" android:textColor="@color/white" android:gravity="center" android:textSize="40sp"/> </LinearLayout> 最后就是核心代码了,因为使用悬浮窗是需要权限,高版本还需要用户授权才可以,所以我这里直接继承PopupWindow来编写。
class MToast private constructor() : PopupWindow( ViewGroup.LayoutParams.WRAP_CONTENT, ViewGroup.LayoutParams.WRAP_CONTENT ) { private var mActivity: WeakReference<Activity>? = null private var mView: WeakReference<View>? = null private var mText: WeakReference<TextView>? = null private var textQueue: Queue<ArrayList<Any>> = LinkedBlockingQueue() // 最大等待显示数目 private val maxWaitShowNumber = 10 // 左右内边距之和 private var paddingWidth = 0 companion object { fun makeText( context: Context, text: String, showLength: Int = Toast.LENGTH_SHORT ): MToast { val instance = Inner.instance if (instance.maxWaitShowNumber > instance.textQueue.size) { instance.textQueue.offer(arrayListOf(text, showLength * 2 + 1)) } val activity = context as Activity if (instance.mActivity?.get()?.localClassName != activity.localClassName) { instance.mActivity = WeakReference(activity) instance.initView() } return instance } } private object Inner { var instance: MToast = MToast() } @SuppressLint("InflateParams") private fun initView() { mActivity?.get()?.let { val view = LayoutInflater.from(it) .inflate(R.layout.alert_dialog_toast, null, false) mView = WeakReference(view) mText = WeakReference(view.findViewById(R.id.toast_text)) paddingWidth = view.paddingStart + view.paddingEnd contentView = view // 不设置焦点 isFocusable = false // 点击后退键pop消失 isTouchable = false setBackgroundDrawable(ColorDrawable(0x00000000)) // 设置自带的淡出淡入效果 animationStyle = R.style.Animation_AppCompat_Dialog } } fun show() { if (!isShowing) { textQueue.poll()?.let { item -> mActivity?.get()?.let { val nText = item[0] as String val showLength = item[1] as Int mText?.get()?.let { textView -> textView.text = nText // 界面宽高 val heightPixels = DisplayUtil.getHeight() val widthPixels = DisplayUtil.getWidth() // 内容宽度+布局宽度 val dw = StaticLayout.getDesiredWidth(nText, textView.paint) val cmpWidth = dw.toInt() + paddingWidth width = if (cmpWidth > widthPixels) widthPixels - paddingWidth else cmpWidth showAtLocation(it.window.decorView, Gravity.CENTER, 0, heightPixels / 2 - heightPixels / 10) CoroutineUtil.execIO { delay(showLength * 1000L) withContext(Dispatchers.Main) { hide() if (textQueue.size > 0) { show() } } } } } } } } private fun hide() { if (isShowing) { dismiss() } } } 这里调用和Toast的调用一样,但实际上还是有一些区别,这里做成了静态单例类,然后有一个队列来装要显示的数据,通过makeText进行添加,show则是按顺序显示在队列里的数据,直到没有为止。
MToast.makeText(context, "msg", Toast.LENGTH_SHORT).show() Acitivity切换的时候应该还是会存在一些问题,不过常规使用应该可以了